


I've always been proud to be Welsh. My dad was born and raised in Cardiff, which is pretty close to the English border, and I almost went to university there - but ended up in So Cal instead (totally not the same, I understand).
At the end of our sophomore year of high school, we got to go on a week trip to Brecon Beacons, where I spent a week rock climbing, mountain biking (literally), splunking, canoeing and watching my classmates shamelessly flirt with the instructors. That's what happens when you put forty 16-year old females in a confined space with 6 pretty hot 20-something males. My dad was highly amused when I returned with a Welsh accent. (Note: Mark Salter, I will always remember you for playing football with me and sharing your bag of crisps while watching my classmates get shot down by your co-workers. Oh yeah, and for catching me from falling off that one cliff overhang.)
Anyway, some folks think of Wales and associate it with mountains, castles and sheep. Well, there would be a lot of all of those there. What is fantastic is taking those elements and turning them into something that may well put [whatever small village in Wales they are from] on the map. This just lit up my morning...literally...and I have never been more proud of my heritage!
Wednesday, March 18, 2009

Wednesday, March 11, 2009
Etsy mini tutorial!
I am constantly seeing posts in the forums on Etsy from people who are a little confused as to how they can add their Etsy mini to their blogspot. So, here's a little tutorial that I wanted to share.
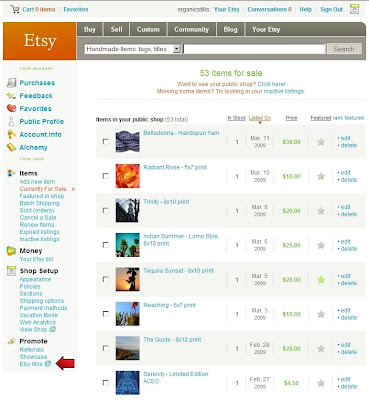
Step 1: Locate your Etsy mini. by clicking on "Your Etsy" at the top of the page. The link to your Etsy mini is on the lower left column of the page.
 Step 2: When the Etsy mini page comes up, you can now choose to show "items from my shop" and decide between thumbnails or gallery. I personally like thumbnails as it isn't too big. Then decide on how many columns and rows you want it to show. I chose 2 columns, 4 rows for this demonstration.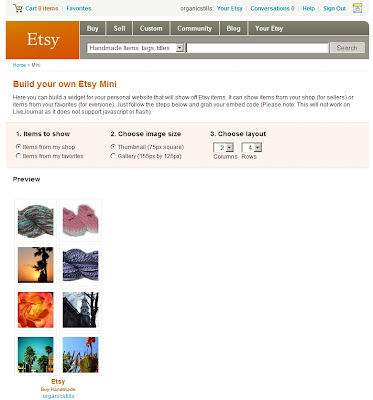
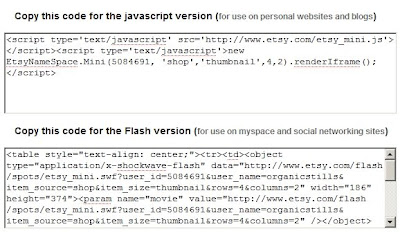
Step 3: At the bottom of the Etsy mini page, you will see two boxes with a bunch of html type blurb. The first box has the javascript version, which is what you would use for blogger. Keep this page open in your browser, we'll be coming back to it in a minute.
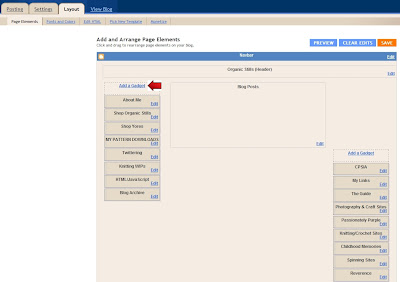
 Step 4: In another window, open up your blogspot. Click on the "layout" tab to get to the page where you can change how your blogspot looks. Most people probably have a 2 column blogspot. Mine is three columns and for this example I will be adding the Etsy mini to the left column of my blog by clicking on the "Add A Gadget" button. As you can see, that same button exists on the right hand column if I wanted to add it there instead.
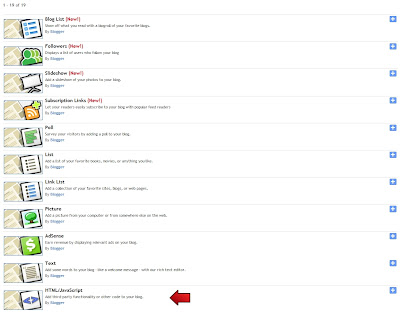
 Step 5: Once you click on the "Add A Gadget" link, a new window will open up that looks like the one below. Scroll down to locate the gadget that says "HTML/Javascript" then click on the + sign for that gadget.
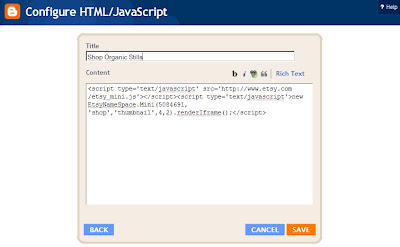
 Step 6: Now you've clicked on that, you will be taken to the screen where you can edit that gadget. Where it says "title", that will be the title that will appear on your blog above your Etsy mini. You can title it whatever you'd like, or you can even leave it blank if you want. I've called mine "Shop Organic Stills". Now you need to copy and paste the html that Etsy generated for you. Click back over to your Etsy mini page and copy all the text in the javascript version box (click in the box, Ctrl+A, Ctrl+C). Click back over to the gadget box in blogger and paste that right into the "content" box (Ctrl+V). Then remember to hit the save button!
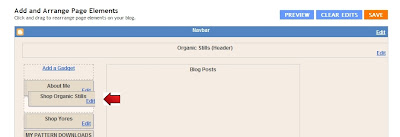
 Step 7: You will now be back at your layout page for your blogger. You should now be able to see the gadget that you have added. You can click and drag it to anywhere that you want it to show on your blog. Once that is done, hit the save button on the top right again to lock it into place. You can now view your blog and there it is for all to enjoy!
 I hope this helps any of you that have been confused! If you have more than one Etsy shop, then just repeat these steps for your other shop and you can have more than one Etsy mini on your blog (check out my left sidebar for an example).
Step 1: Locate your Etsy mini. by clicking on "Your Etsy" at the top of the page. The link to your Etsy mini is on the lower left column of the page.
 Step 2: When the Etsy mini page comes up, you can now choose to show "items from my shop" and decide between thumbnails or gallery. I personally like thumbnails as it isn't too big. Then decide on how many columns and rows you want it to show. I chose 2 columns, 4 rows for this demonstration.
Step 3: At the bottom of the Etsy mini page, you will see two boxes with a bunch of html type blurb. The first box has the javascript version, which is what you would use for blogger. Keep this page open in your browser, we'll be coming back to it in a minute.
 Step 4: In another window, open up your blogspot. Click on the "layout" tab to get to the page where you can change how your blogspot looks. Most people probably have a 2 column blogspot. Mine is three columns and for this example I will be adding the Etsy mini to the left column of my blog by clicking on the "Add A Gadget" button. As you can see, that same button exists on the right hand column if I wanted to add it there instead.
 Step 5: Once you click on the "Add A Gadget" link, a new window will open up that looks like the one below. Scroll down to locate the gadget that says "HTML/Javascript" then click on the + sign for that gadget.
 Step 6: Now you've clicked on that, you will be taken to the screen where you can edit that gadget. Where it says "title", that will be the title that will appear on your blog above your Etsy mini. You can title it whatever you'd like, or you can even leave it blank if you want. I've called mine "Shop Organic Stills". Now you need to copy and paste the html that Etsy generated for you. Click back over to your Etsy mini page and copy all the text in the javascript version box (click in the box, Ctrl+A, Ctrl+C). Click back over to the gadget box in blogger and paste that right into the "content" box (Ctrl+V). Then remember to hit the save button!
 Step 7: You will now be back at your layout page for your blogger. You should now be able to see the gadget that you have added. You can click and drag it to anywhere that you want it to show on your blog. Once that is done, hit the save button on the top right again to lock it into place. You can now view your blog and there it is for all to enjoy!
 I hope this helps any of you that have been confused! If you have more than one Etsy shop, then just repeat these steps for your other shop and you can have more than one Etsy mini on your blog (check out my left sidebar for an example).
Monday, March 9, 2009
Yard sale fun
 I've been trying to stock up on items for my new vintage store and with the husband out and about playing paintball with his old friends from high school, it seemed like the perfect opportunity to hit up some Sunday morning yard sales! I've never actually dropped by a yard sale before but did my due diligence and checked out what was on Craigslist, then mapped out the ones that were close to each other. It's pretty amazing how many yard sales you can find within a 2 mile radius.
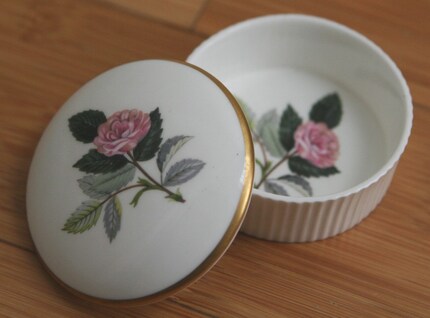
It has to be said, I didn't find all that much that was worthwhile but did find a gorgeous wooden photo box (similar to this one). I've been looking for the right receptacle for photos that can be displayed in the living room and this will be perfect. I also came across a gorgeous little vintage Wedgewood trinket box, which I have now listed in my Etsy store. It's got a small fracture in it, but is beautiful nonetheless. Completely random fact is that Josiah Wedgewood was Charles Darwin's grandfather. That's some evolutionary ceramics for you right there!
I know that our HOA is discussing holding a community yard sale in our courtyard (there's only 10 units so it would be manageable) and I'm getting excited about the prospect. We got rid of a ton of things when we moved in 6 months ago, but that's not to say there isn't still a bunch of things to pass on to others via some yard sale fun.
Friday, March 6, 2009

Tuesday, March 3, 2009
Blast from the past
 It's official, my new vintage Etsy store is open. I wasn't really planning on opening a second Etsy store (I know, one is hard enough to keep track of sometimes!) but I had a major find last week with a whole batch of vintage sewing patterns that I was able to purchase. I knew that it wouldn't work to just put them in with the rest of the Organic Stills stuff, so my husband says to me "well, just open a vintage store then". That's how Yores was born! Yes, the name is a delightfully dorky double-entendre, but I should hope you expect nothing less of me.
It has to be said, I am somewhat in love with this dress/camisole pattern. It's definitely got a classic summer style. I'm sad that I missed out on buying the fabulously retro jumpsuit pattern, but I will try to be quicker off the mark next time around.
The whole vintage shop thing has got me really excited in general and I spent the weekend rummaging around for additional things to list in my new shop along with the sewing patterns. So far I've found some pretty housewares that I'll be sharing with the world as soon as I can get the research done to date the pieces I've got. I'm no Jonty from BBC's Cash In The Attic but if any of those adorable Cash In The Attic boys want to come over and help me out, I certainly wouldn't complain!
Friday, February 27, 2009
An ode to the creme egg
Growing up in England, I was completely spoiled by the choice of Cadbury's chocolate available to me. I even went on a school trip way back when to the factory where you end up in a room filled with the stuff at wholesale prices. That's right, a dream for a 16 year old with a chocolate fetish. After moving to California though, it was somewhat distressing to me for a while that I couldn't get it out here because there's something about Hersheys that just isn't the same. Interestingly enough, Hersheys picked up the license for Cadbury's in the U.S. now. This means that I can pick up a limited selection, usually at CVS Pharmacy (of all places). I'm much happier about that, but I do lament over the Creme Egg situation.
In the UK, you can get Creme Eggs any time of year. The delicious chocolate s hell with the gooey sugary mix of mystery filling. You bite off the top, suck out the insides and still have the rest of the chocolate shell to eat for dessert. I would like to know why can I only get them at Easter?! I don't recall small print on Creme Eggs saying they should only be on offer if there's the possibility that the Easter bunny delivered them. Further to that, why is it that the American Creme Eggs are smaller? They're under license to Hersheys out here, but in a land where everything is bigger, you decide to shrink the eggs and then restrict how often I get to eat them? I shake my fist at you.
Speaking of Easter eggs in general, the Brits seem so much better about making big old chocolate eggs that have the tasty chocolate shell but are also filled with candy on the inside. These eggs exist for almost every brand of chocolate that I can think of back home - eggs filled with jelly beans, eggs filled with M&Ms, and so on. Out here, there is something not quite as fun about the hollow chocolate bunny. You bite off his ears and there is no surprise awaiting you on the inside. It's sad, but true.
I know that a world exists where my beloved Creme Eggs can be bought and savored year round. For now, I will try to see the silver lining and be happy that I can get them at all. Well, now you know how I like mine, the question is....how do you eat yours?
In the UK, you can get Creme Eggs any time of year. The delicious chocolate s
 hell with the gooey sugary mix of mystery filling. You bite off the top, suck out the insides and still have the rest of the chocolate shell to eat for dessert. I would like to know why can I only get them at Easter?! I don't recall small print on Creme Eggs saying they should only be on offer if there's the possibility that the Easter bunny delivered them. Further to that, why is it that the American Creme Eggs are smaller? They're under license to Hersheys out here, but in a land where everything is bigger, you decide to shrink the eggs and then restrict how often I get to eat them? I shake my fist at you.
Speaking of Easter eggs in general, the Brits seem so much better about making big old chocolate eggs that have the tasty chocolate shell but are also filled with candy on the inside. These eggs exist for almost every brand of chocolate that I can think of back home - eggs filled with jelly beans, eggs filled with M&Ms, and so on. Out here, there is something not quite as fun about the hollow chocolate bunny. You bite off his ears and there is no surprise awaiting you on the inside. It's sad, but true.
I know that a world exists where my beloved Creme Eggs can be bought and savored year round. For now, I will try to see the silver lining and be happy that I can get them at all. Well, now you know how I like mine, the question is....how do you eat yours?
Monday, February 23, 2009
Spent all weekend getting funky
I was inspired to try out some things with Photoshop this weekend while my husband was busy producing music in the basement. To the dulcet tones of his bass speaker, I decided that it was a good time to play with some of my photos.
It has to be said that I've always been somewhat resistent to messing with my photos much. I take a lot of time to compose my shots so that they don't need to be post-produced. However, I am realizing that post-production definitely has its place when done correctly. I'm pretty happy with my efforts and of course have to share them with you here!
I tried out a Lomo effect on this picture. Lomography has characteristics including high color saturation and vignettes. Next up was this picture of the Old Mission Santa Barbara. My brother lives up in Santa Barbara which is a wonderfully peaceful town and I visited on a quiet weekday when there weren't too many visitors. Just walking around the mission, there is such history there that I decided to add some age to this photograph.
 Finally, I've thousands of wedding photographs that I've been meaning to organize from the wedding shoots I've done over the last few years. This is one of my favorite photographs. I love capturing the quiet moments. In this case, the bride was waiting for her family to gather for formal shots and was looking at her chuppah, which was covered in the most beautiful flower garlands. I added a little warmth and soft lighting to the natural dusk lighting that the original photo was taken in.
  Now I've had a chance to learn some new things about Photoshop, I'm really looking forward to going through my photos and finding new pictures to tweak. I'd love to hear opinions on what you are seeing here!
It has to be said that I've always been somewhat resistent to messing with my photos much. I take a lot of time to compose my shots so that they don't need to be post-produced. However, I am realizing that post-production definitely has its place when done correctly. I'm pretty happy with my efforts and of course have to share them with you here!
I tried out a Lomo effect on this picture. Lomography has characteristics including high color saturation and vignettes.
 Next up was this picture of the Old Mission Santa Barbara. My brother lives up in Santa Barbara which is a wonderfully peaceful town and I visited on a quiet weekday when there weren't too many visitors. Just walking around the mission, there is such history there that I decided to add some age to this photograph.
 Finally, I've thousands of wedding photographs that I've been meaning to organize from the wedding shoots I've done over the last few years. This is one of my favorite photographs. I love capturing the quiet moments. In this case, the bride was waiting for her family to gather for formal shots and was looking at her chuppah, which was covered in the most beautiful flower garlands. I added a little warmth and soft lighting to the natural dusk lighting that the original photo was taken in.
  Now I've had a chance to learn some new things about Photoshop, I'm really looking forward to going through my photos and finding new pictures to tweak. I'd love to hear opinions on what you are seeing here!
Subscribe to:
Posts (Atom)


